Embedding a Jupyter Notebook
 Teri Forey
Note: this blog has previously been published on Medium
We at Wellcome Trust Data Labs have recently started building a new service for sharing data between funders. As much of this data is highly restricted, all analysis must occur within our platform. Users will not be able to download data to their local machine. We’ve therefore created our own functionality to plot metrics, and to create tables of summarized data but for more advanced analysis we’d like to provide a notebook-style way of working. Instead of rewriting the wheel, it seemed more prudent to look at ways of integrating existing notebooks within our application, the most common of which is Jupyter.
Jupyter notebooks integrate code and markdown text into a single document, allowing users to analyze and interpret their results all in one place. Most users will typically run Jupyter locally, which will start a local web server allowing users to view, edit and manage files within their browser. For those who wish to provide Jupyter notebooks as a service, for example within a classroom or department, there is JupyterHub. This runs another web server, which allows users to login and will spawn a Jupyter notebook server per user. Both Jupyter and JupyterHub are completely configurable, allowing you to use your own authentication, choose how notebooks are spawned and define the environment within those notebooks.
Our goal was therefore to embed a Jupyter notebook within our application in a way that would scale with our user base, provide a secure method of analysing internal data and wouldn’t conflict with our other analysis functions.
How did we do it
In this blog post I’ll walk through the individual steps we took to embed Jupyter within our application. Although this isn’t a tutorial and we don’t show all the written code, this should provide enough information for other developers looking to embed Jupyter.
There are multiple different ways to launch JupyterHub from running it locally to within a Kubernetes cluster. In our case we ran JupyterHub within a docker container, and used DockerSpawner, which, as the name suggests, spawns Jupyter servers within their own docker container. This setup meant that Jupyterhub was accessible locally on port 8000 (http://localhost:8000) and should scale well up to ~100 concurrent users. Although the steps below should be generic enough for any JupyterHub installation, please bear in mind that some details could differ.
Connect to the API
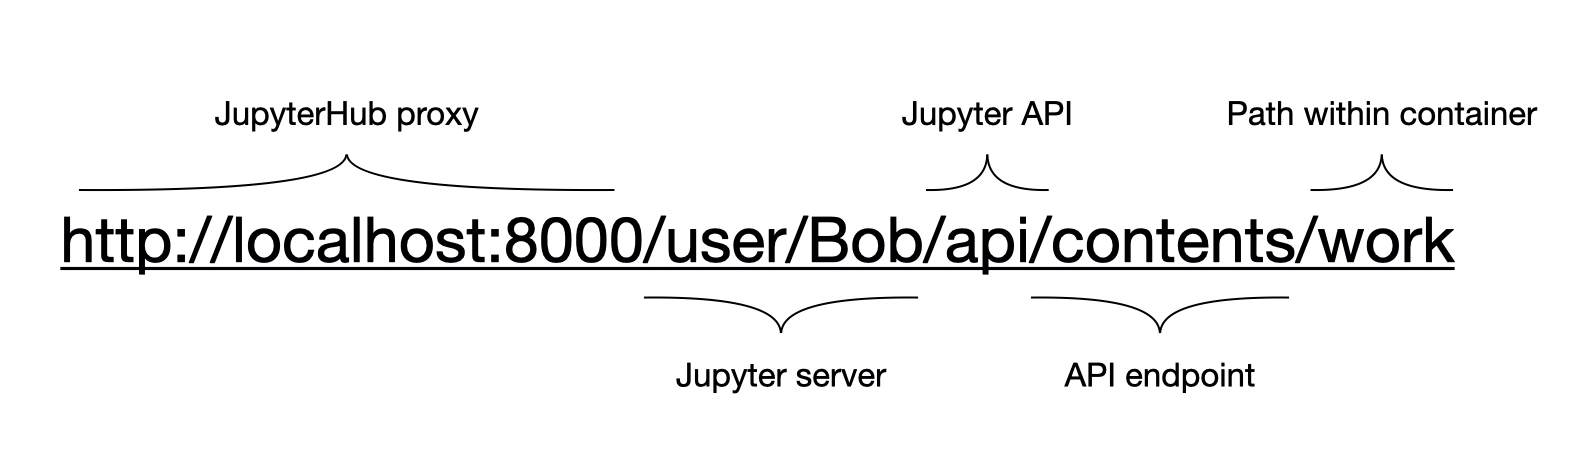
For our application to interact with JupyterHub we needed to use the API. Both JupyterHub and the Jupyter notebook servers provide a web API, so depending on the URL and HTTP request method we can programmatically interact with them from within our service. Note that all requests go through the JupyterHub proxy, and therefore all our requests are sent to localhost:8000 irrespective of their final destination.
Accessing an API like this is extremely powerful, we can create and delete users, access tokens and even start Jupyter notebook servers. For this reason, access to certain functions within the JupyterHub API is restricted to administrators only. Therefore the first thing we needed to do was configure JupyterHub to recognise our service as an admin. To do this we create a jupyterhub_config.py file and copy this into the /srv/jupyterhub/ folder within our JupyterHub container. This file is then read when JupyterHub starts, specifying how it should function. As part of installing JupyterHub and a spawner, you have probably already created this file so the below settings just need to be added.
c.JupyterHub.services = [
{"name": "my-app", "api_token": secret-token, "admin": True,}
]
This sets a name for our service, a token which provides access to the API, and sets this service to be an administrator. Both the name and token should be changed, as the token provides full access to the Jupyter server it should be kept secret. To test that it’s working, try using this token to connect to the API via curl within a terminal window. The following command should return a list of all users (beware that you might not have any users yet).
curl localhost:8000/hub/api/users -H "Authorization: Token secret-token"
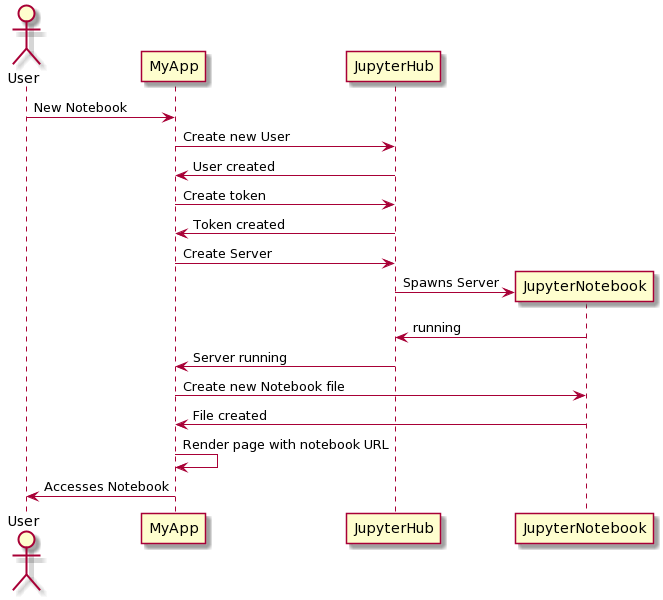
Now that we have the means to connect to the API, we can use our secret token to start making requests. The first thing we want to do when a user tries to access a notebook within our service is to ensure that they have a user account in Jupyter. According to the JupyterHub documentation we can do this through the API by accessing the URL /hub/api/users/ followed by their username. A GET request to this URL would just return information about that user, but a POST request would create a new user account. If the user in our application is called Bob, we can therefore run the following Python code to create a new Jupyter user account for them.
Import requests

headers = {
        "Authorization": "Token secret-token",
        "Content-Type": "application/json",
    }


R = requests.post("http://localhost:8000/hub/api/users/Bob", headers=headers)
As well as providing our secret token, we also set the content type to be JSON so the results will be returned in this format. It should be noted that we’re making this request within our python server-side code, so that our secret token is never revealed to the client.
Now that we have created a new user, we need a way for that user to authenticate themselves with Jupyter. By default JupyterHub will display a login screen where users can enter their password, but as our users are already authenticated within our application we want to make this a seamless transition. We therefore create a token specific for that user, this won’t give them full access to the JupyterHub API but it does allow them to connect to their own Jupyter notebook server. For our user Bob, we’d create and access that token using the following.
…

r = requests.post("http://localhost:8000/hub/api/users/Bob/tokens", headers=headers)

res = r.json()
Token = res.get("token")
Create a Notebook
Now that we have a user account within JupyterHub, and a token to authenticate them, we can start a Jupyter notebook and create our first file. These requests only use our new user-token so can occur client-side, within our javascript application. We first request a new server, which as we saw earlier must be a POST request.
fetch("http://locahost:8000/hub/api/users/Bob/server", {
            method: 'POST',
            headers: {
                'Authorization': 'Token ' + token,
                'Content-Type': 'application/json',
            }
        })
Depending on the state of the requested server, this will either return a status of 201 to say the server has started, a status of 202 to say the server has been requested but hasn’t yet started, or a status of 400 saying that the server is already running.
Once the server is running, we could set the iframe to the appropriate URL and the user would have an empty home directory in which they can create files, notebooks etc. However, throughout our application we store all analyses within our own database, provide a list of previously created plots or tables and allow users to edit, view or delete them. To now show a directory means that we are providing a very different interface, and we’ll need a different method to store files. Ideally we’d want to keep the user interactions the same as with the non-jupyter analysis parts of our application. We therefore want to show or open a specific file within our iframe, instead of the working directory.
To do this we again turn to the API, however this time we need the API within the single user Jupyter server we just started. The URL is therefore more complicated as we first need to point it towards the correct server, and then access the API. Once we reach that API though, there’s an extremely useful endpoint which can allow us to access the contents of a file. If we access this endpoint with a GET request, we will return the contents allowing us to save the file within our database. Accessing the same endpoint with a POST request will create a new empty notebook file, returning the filename that we’d need to direct the iframe. We can also access this endpoint with a PUT request, passing in some data and it will create a new file with that content. These three methods give us all the functionality we need to provide a one-to-one relationship between our application and a Jupyter notebook file.
So, to create an empty notebook file we can make the following request. This will generate a new empty notebook file within the work directory.
fetch("http://localhost:8000/user/Bob/api/contents/work", {
            method: 'POST',
            headers: {
                'Authorization': 'Token ' + token,
                'Content-Type': 'application/json',
            },
            body: JSON.stringify({
                type: "notebook"
            })
        })
If we have stored content from a previous notebook file, we can then re-engineer this file using the same API endpoint. This time we assign it a specific filename and pass in the file contents within the body, we also use the PUT method.
fetch("http://localhost:8000/user/Bob/api/contents/work/" + filename, {
            method: 'PUT',
            headers: {
                'Authorization': 'Token ' + token,
                'Content-Type': 'application/json',
            },
            body: JSON.stringify({
                "name": filename,
                "type": "notebook",
                "format": "text",
                "content": content
            })
        })
Depending on which method we use, we’re now able to generate all the files we need, without having to mount any storage/folders to our docker containers. We can then set the iframe to display the newly created notebook file. Thus providing our one-to-one relationship between our application and a single Jupyter notebook analysis. For a file named ‘Untitled.ipynb’, we’d set the iframe to the following:
http://localhost:8000/user/Bob/notebooks/work/Untitled.ipynb?token=token
This connects to our JupyterHub server running at localhost:8000, goes through the proxy to the user-specific notebook server, and then opens the file we created earlier. We also pass the token across to authenticate our request.
Content Security Policy
At this point, what you might be seeing instead of the notebook file, is a warning about the Content Security Policy (CSP) restricting your access. This is because CSP is designed to protect servers from cross-site scripting attacks, and will stop someone from using an iframe to display your own website within theirs. What we therefore need to do is to set the CSP for our JupyterHub and notebook servers to permit access from our application. So, if for example our application that we want to embed Jupyter within is running on localhost:8090, we need to set certain exceptions for that domain. This will mean that only our application, running on localhost:8090, will be able to use an iframe to embed the Jupyter servers. The setting for JupyterHub is
c.JupyterHub.tornado_settings = {
    "headers": {
        "Content-Security-Policy": "frame-ancestors 'self' http://localhost:8090",
        "Access-Control-Allow-Origin": "http://locahost:8090",
    }
}
We also need to apply the same setting to our single user Jupyter servers, in this case we copy the file jupyter_notebook_config.py into /etc/jupyter/ within our docker image. This file contains the same headers settings as above, but for the c.NotebookApp.tornado_settings option.
Once these changes have been made, and the servers restarted, you should then be able to access Jupyter within the iframe.
Saving a Notebook
Now that we have a working notebook file being created and displayed within our iframe, the next stage is to save the contents within our application’s database. To do this, as mentioned above, we can use the same API endpoint that creates a file to return the file contents. Therefore the following request can be made when we tell our application to save the Jupyter notebook.
fetch("http://locahost:8000/user/Bob/api/contents/work/Untitled.ipynb?type=file&format=text&content=1", {
            method: 'GET',
            headers: {
                'Authorization': 'Token ' + token,
                'Content-Type': 'application/json',
            }
        })
Unfortunately what became clear is that this request will only return the last saved content of the file, and therefore if we click ‘Save’ within our application before the Jupyter notebook has autosaved, we return empty contents. This brings up another point, within the notebook there is a button to save the file which will save it within the Jupyter server but this is a different functionality to the Save button within our own application. To have two methods of saving the file within the same page, which have different functionality, is confusing so we needed a way to align both methods. This meant communicating between our application and the iframe.
Accessing elements within an iframe is, sensibly, highly restricted, we therefore couldn’t just trigger a ‘click’ on the internal save button. Instead we used an HTML method called postMessage to send an event to the window holding the iframe, these messages can work between embedded pages and their parent page or between tabs and most importantly can work across different domains. Therefore when a user clicks save within our application, we can post a message to the iframe in the hopes of triggering the save within the notebook itself. The post message has to contain the domain name of the target to confirm that these match.
const iframe = document.getElementById('jupyterframe');
iframe.contentWindow.postMessage("pleaseSave", "http://localhost:8000");
We now need to capture this message within the Jupyter notebook scripts, this means adding some custom javascript. A process to do this within Jupyter has already been set up for us, by copying a file named ‘custom.js’ to .jupyter/custom/ this file will be read and executed by the Jupyter notebook server. To capture the postMessage, we add the following event listener.
define(['base/js/namespace', "base/js/events"], function(Jupyter, events){
    Jupyter._target = '_self';

    window.addEventListener('message', event => {
        if (event.origin.startsWith("http://locahost:8090")) {
            console.log("Notebook - Calling save Action");
            Jupyter.actions.call("jupyter-notebook:save-notebook");
        }
    })
});
Not only do we listen for the message event here, but we also check that it came from the origin we were expecting, i.e. our own application. If it does, then we call an action within the Jupyter object, which triggers a save within the notebook. Thus linking our save button to saving the actual Notebook file within the Jupyter server.
The next step is to know when this action has been completed, so we can pull the contents in our application and save them in our database. To do this, we again use PostMessage to communicate between our iframe and the parent window.
…
events.on('notebook_saved.Notebook', function() {
        console.log("Notebook - Saved");
        window.parent.postMessage("SAVED", "http://locahost:8090");
    });
...
The above code is also in our custom.js file, and is triggered on the event called when a notebook has been saved. Note that this is therefore triggered not only when we call the save action, but also when a user clicks on the save button within the notebook. This postmessage is now from the iframe to the parent window, and therefore the target origin is the domain of our main application.
Within the javascript of our own application we can then add an event listener for this message, much as we did within the Jupyter notebook js. Once it’s triggered we can use the API call to return the file contents, which now contain the latest changes, and this can be saved into our database.
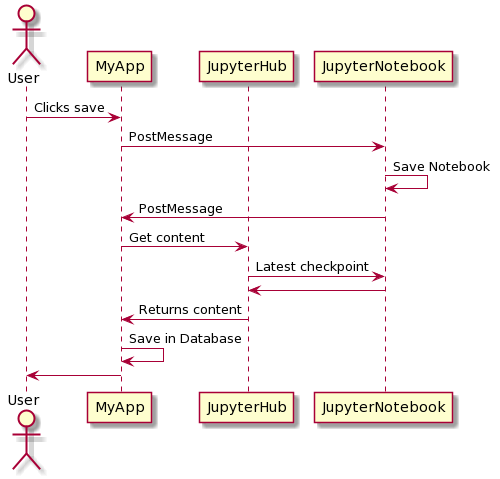
Using these two postMessages we’ve therefore been able to link up the save buttons within our application to those within the Jupyter notebook and both now perform the same actions.
Summary
By utilizing the JupyterHub API, adding custom javascript and sending postMessages between windows we’ve been able to integrate Jupyter notebooks within our own application. Not only can users now use the full functionality of Jupyter to analyse data, but they’re also able to open and access files in the same manner as all other parts of our application.
We hope that the process described here, along with the code snippets, help any developers looking to embed Jupyter within their own application.